AdMob SDK for iOS: v6.5.0
XCode: v4.6
iPhone Simulator: v6.1
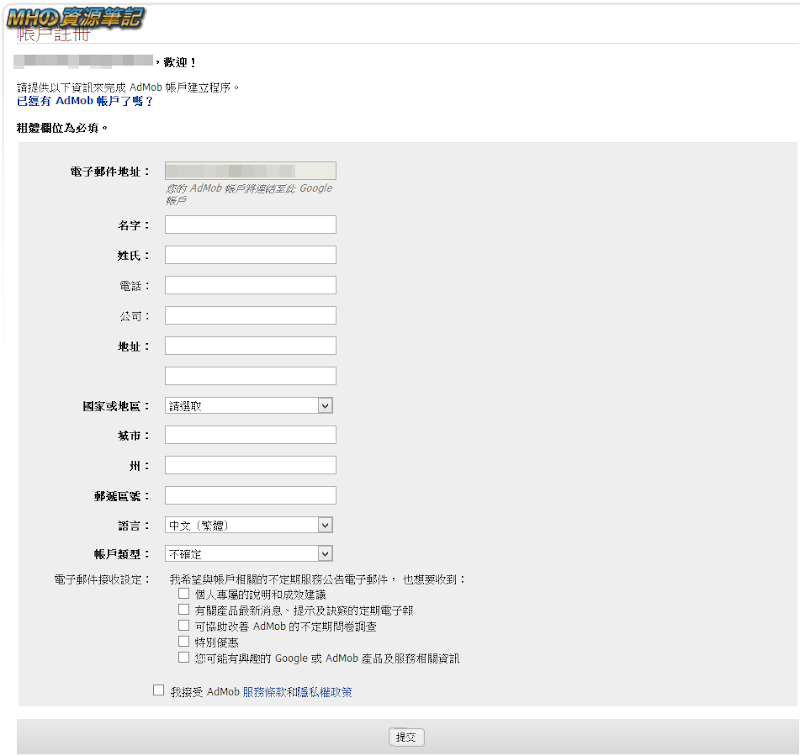
首先請先辦個AdMob帳號:點我前往
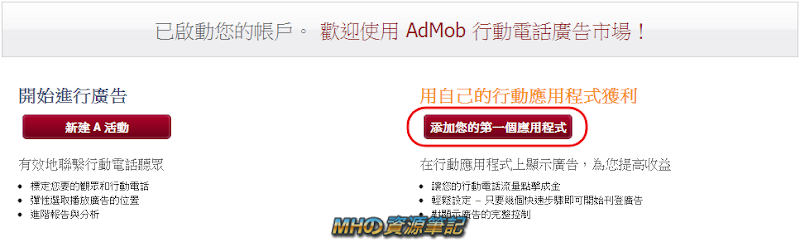
註冊完之後選擇「添加您的第一個應用程式」
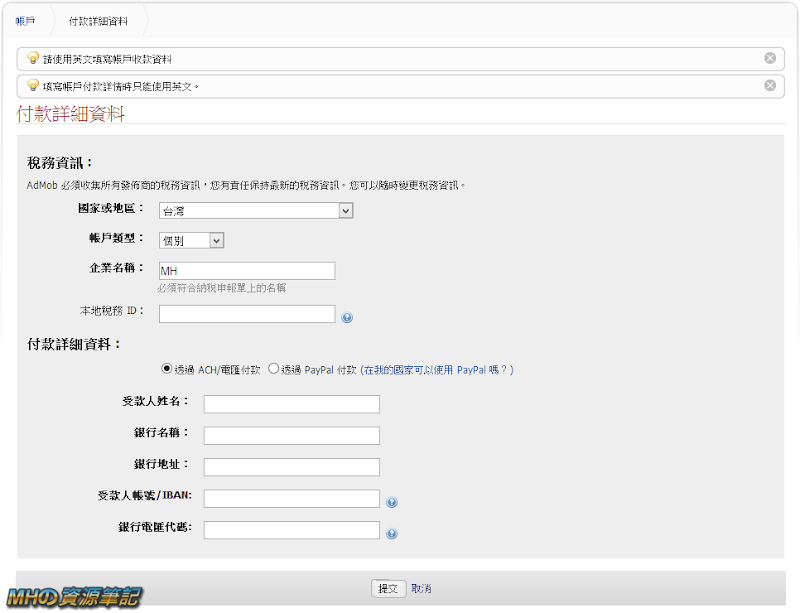
如果還沒填寫「付款詳細資料」的話,AdMob會先要求填寫,本地稅務ID填身分證就可以了
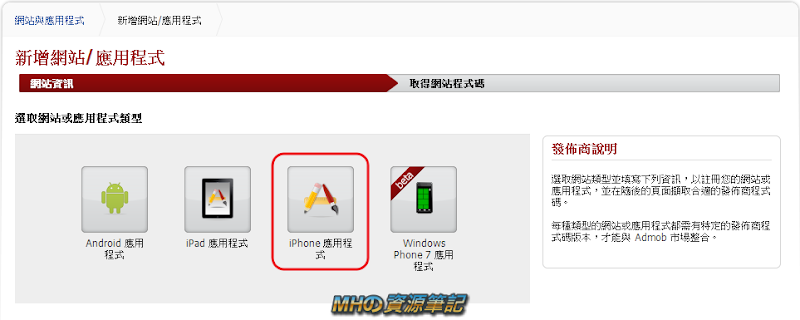
接著選擇「iPhone 應用程式」
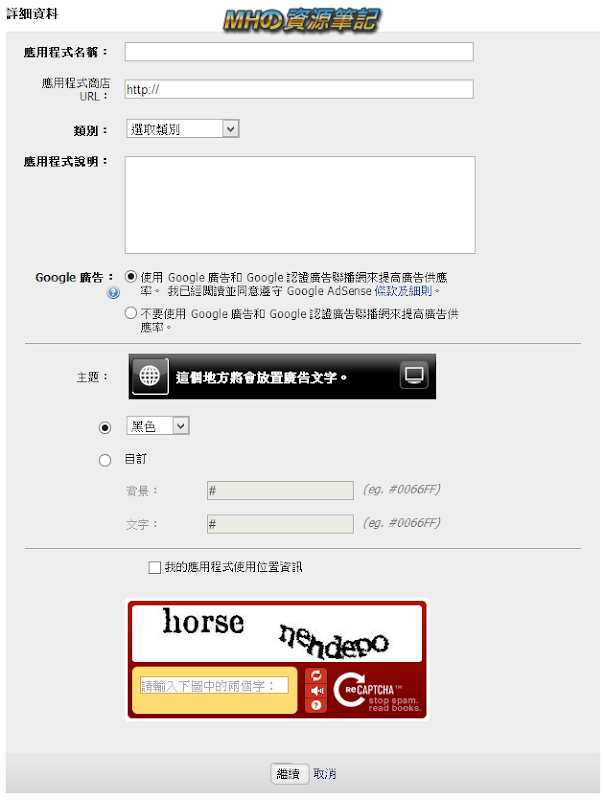
填寫APP相關資料
之後就可以下載AdMob iOS SDK了,也可以直接到Google Mobile Ads SDK Google Mobile Ads SDK下載最新版本
下載完後,將以下檔案加入
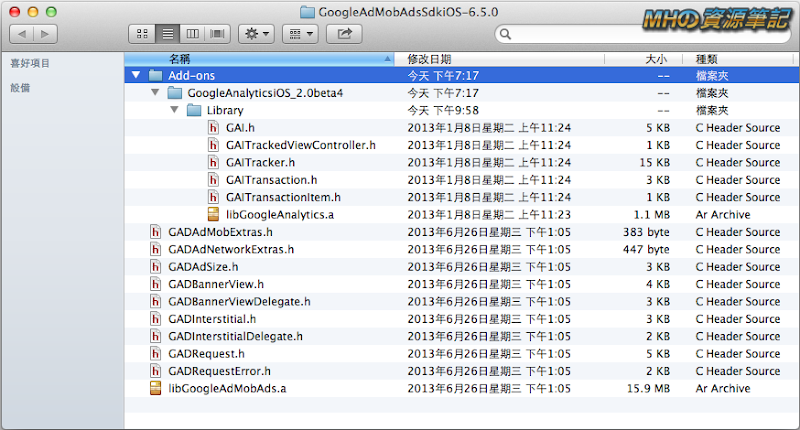
Add-ons
﹂ GoogleAnalyticsiOS_2.0beta4
﹂ Library
﹂ GAI.h
﹂ GAITrackedViewController.h
﹂ GAITracker.h
﹂ GAITransaction.h
﹂ GAITransactionItem.h
﹂ libGoogleAnalytics_debug.a
﹂ libGoogleAnalytics.a
GADAdMobExtras.h
GADAdNetworkExtras.h
GADAdSize.h
GADBannerView.h
GADBannerViewDelegate.h
GADInterstitial.h
GADInterstitialDelegate.h
GADRequest.h
GADRequestError.h
libGoogleAdMobAds.h
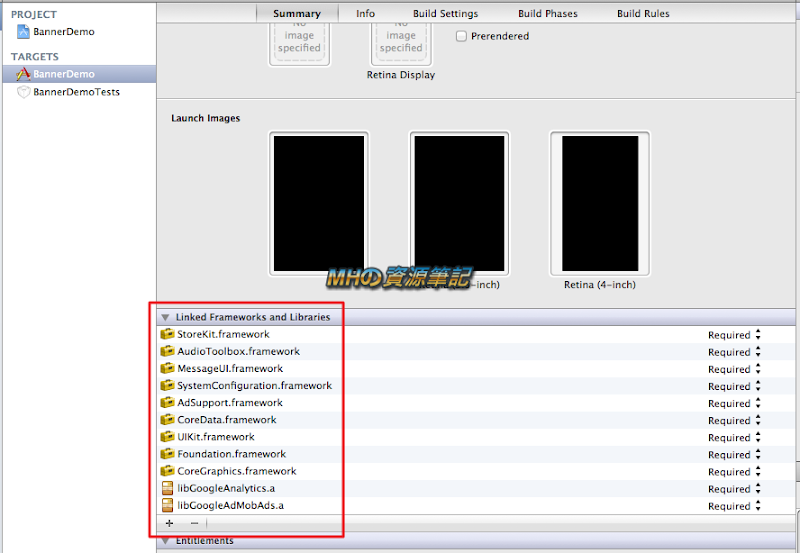
再來到Project → Targets → Summary → Linked Frameworks and Libraries(或Build Phases → Link Binary With Libraries)的地方將以下framework加入
CoreData.framework
AdSupport.framework
SystemConfiguration.framework
MessageUI.framework
AudioToolbox.framework
StoreKit.framework
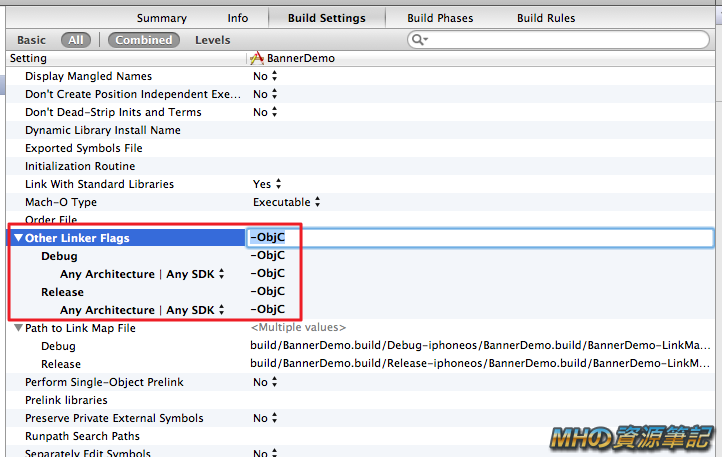
接著再到Project → Targets → Build Settings → Other Linker Flags的地方加上「-ObjC」
最後的步驟就是將廣告程式碼加上去囉!
請在header檔裡加上
#import <UIKit/UIKit.h>
#import "GADBannerView.h"

@interface ViewController : UIViewController {
    // Declare one as an instance variable
    GADBannerView *bannerView_;
}

@end
而.m檔裡則要加上以下程式碼
- (void)viewDidLoad {

    [super viewDidLoad];
    // Do any additional setup after loading the view, typically from a nib.

    // Create a view of the standard size at the top of the screen.
    // Available AdSize constants are explained in GADAdSize.h.
    bannerView_ = [[GADBannerView alloc] initWithFrame:CGRectMake(0.0, self.view.frame.size.height-GAD_SIZE_320x50.height, GAD_SIZE_320x50.width, GAD_SIZE_320x50.height)];    // 調整廣告的位置

    // Specify the ad's "unit identifier". This is your AdMob Publisher ID.
    bannerView_.adUnitID = @"adUnitID ";    // 這裡要填你的「發佈商 ID」

    // Let the runtime know which UIViewController to restore after taking
    // the user wherever the ad goes and add it to the view hierarchy.
    bannerView_.rootViewController = self;
    [self.view addSubview:bannerView_];

    // Initiate a generic request to load it with an ad.
    [bannerView_ loadRequest:[GADRequest request]];
}

- (void)dealloc {

    // Don't release the bannerView_ if you are using ARC in your project
    [bannerView_ release];
    [super dealloc];
}
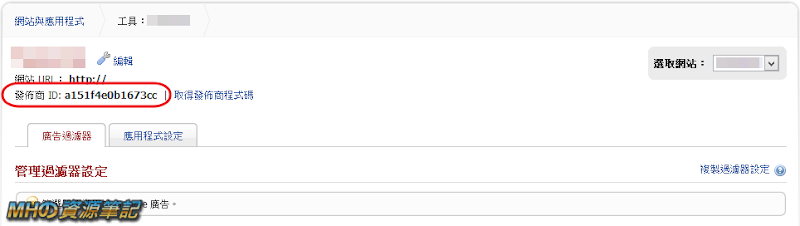
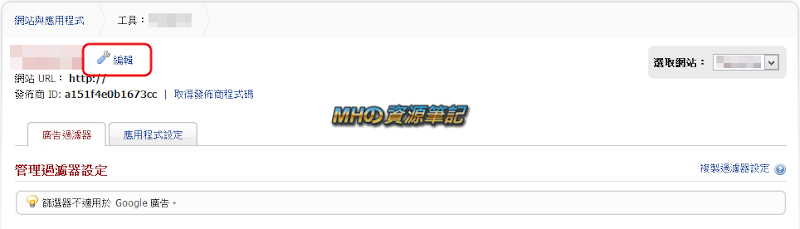
再次提醒,bannerView_.adUnitID 要填你的「發佈商 ID」,「發佈商 ID」可到「網站與應用程式」 → 該APP的「管理設定」就可以找到了

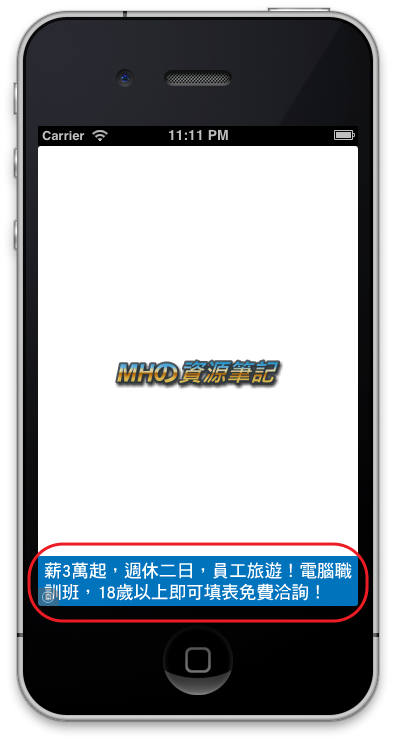
執行後就可以看到結果囉~
不過還有個重要的步驟要做,就是測試時記得將 AdMob 廣告改成測試模式,否則在開發過程中一直瀏覽廣告可是會被視為自己衝廣告曝光/點擊數而被停權喔,那麼該怎麼做呢?
先在放廣告的header檔裡加入以下程式碼
- (GADRequest *)createTestRequest;
而.m檔裡則是加入以下程式碼
- (GADRequest *)createTestRequest{
    GADRequest *request = [GADRequest request];
    request.testDevices = [NSArray arrayWithObjects:GAD_SIMULATOR_ID, [[UIDevice currentDevice] uniqueIdentifier], nil];
    return request;
}
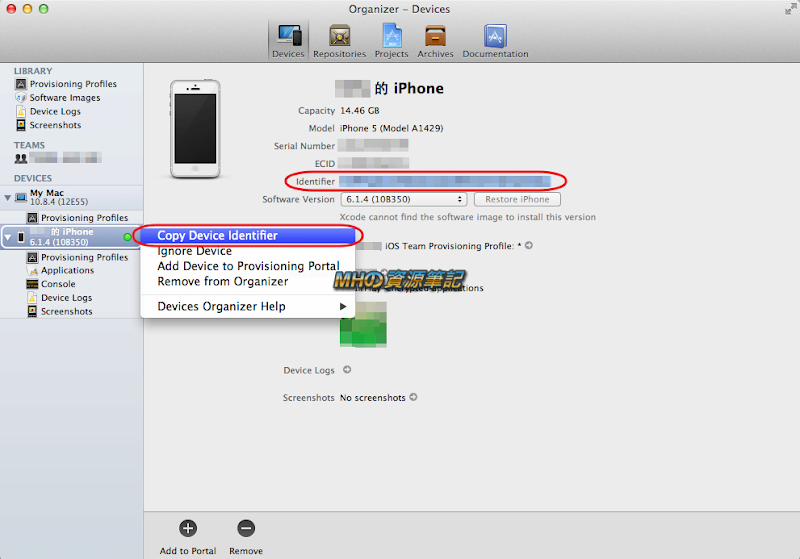
若是在實機測試的話則上面的 ID 則要改一下,先到Xcode工具列選擇「Window」 → 「Organizer」就可以找到,看你是要直接複製 identifier,還是要對著你的實機右鍵點選「Copy Device Identifier」
再把 ID 填上,如下所示
- (GADRequest *)createTestRequest{
    GADRequest *request = [GADRequest request];
    request.testDevices = [NSArray arrayWithObjects:GAD_SIMULATOR_ID, @"你的實機ID", nil];
    return request;
}
最後將前面所載入廣告的程式碼修改一下,將以下程式碼
[bannerView_ loadRequest:[GADRequest request]];
改成以下的樣子
[bannerView_ loadRequest:[self createTestRequest]];
那麼想要更改或刪除廣告該怎麼做呢?
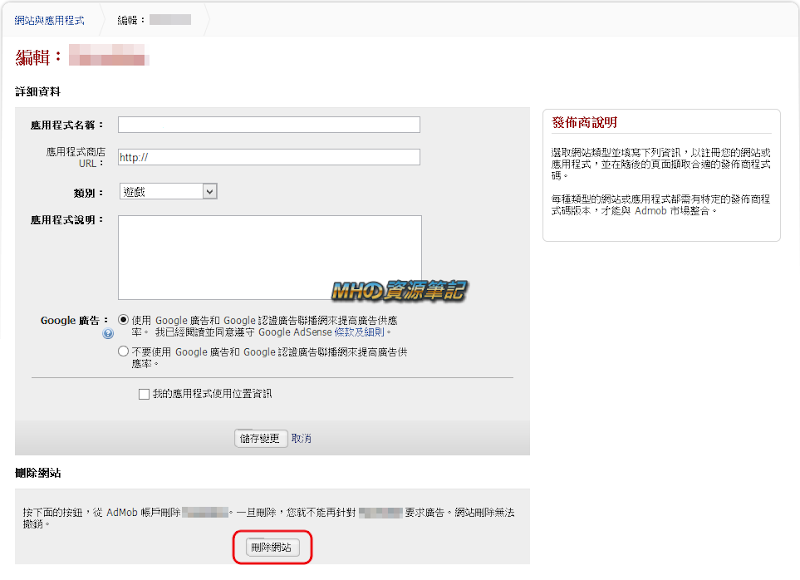
一樣也是「網站與應用程式」 → 該APP的「管理設定」 → 「編輯」就找的到了
Reference:
1. Ad Network Mediation - Publisher Instructions - Google Mobile Ads SDK - Google Developers
2. Banners I - Google Mobile Ads SDK — Google Developers
沒有留言:
張貼留言